
Hey Freaks! here In this article, we will tell you step by step how to bypass selfie verification all method comprehensively . Account verification on exchanges , Loan site etc you know better ;) and earnings on this.
METHOD 1
We take the Fullz data for verification on the exchange We make ourselves documents, or rather print a fake document with a photo, you can laminate it. Next, we take the printed document in our hands and follow the instructions. We change the face — we get a verification.
https://github.com/alievk/avatarify — allows you to swap your face in real time, during a video call on Skype, or zoom.
Installation instructions on Windows
1) Go to this site and download Miniconda python 3.7:

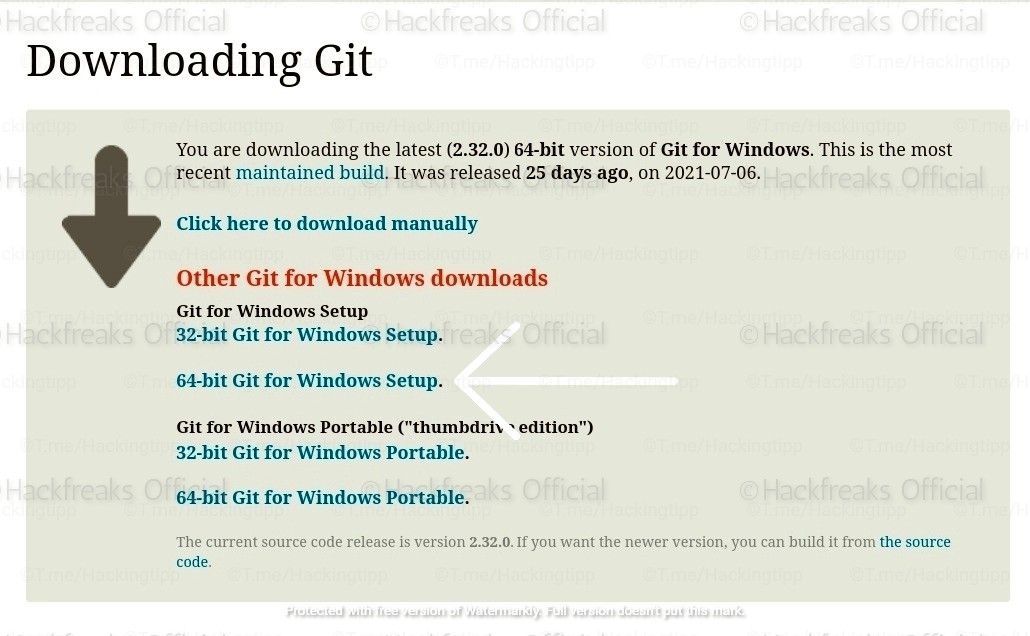
2) Install https://git-scm.com/download/win
Next, enter “Miniconda” in the start-up, and open Anaconda promt:
We enter the commands in the console in order:
git clone https://github.com/alievk/avatarify.git
cd avatarify
scripts \ install_windows.bat
After successful completion, download additional resources from https://drive.google.com/file/d/1L8P-hpBhZi8Q_1vP2KlQ4N6dvlzpYBvZ/view , https://yadi.sk/d/lEw8uRm140L_eQ/vox-adpth.cpk. , https://mega.nz/file/R8kxQKLD#036S-bobZ9IW-kNNcSlgpfJWBKSi5nkhouCYAsxz3qI (of your choice).
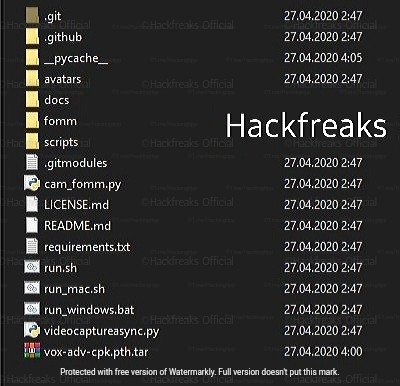
Then we place vox-adv-cpk.pth.tar in the avatarify folder (don’t unpack it).
The avatarify folder is located at C: \ Users \ {username}:
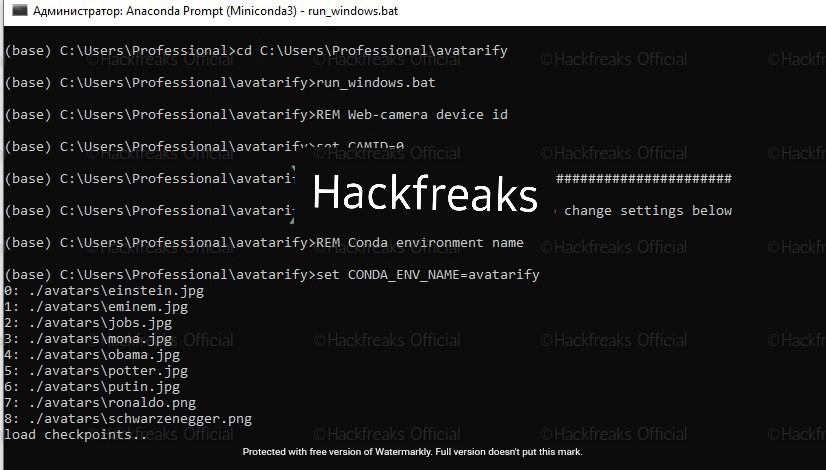
After that, if you have already closed the miniconda console, then open it again, write:
cd C: \ Users \ username \ avatarify
And after that we prescribe the following:
run_windows.bat
Make sure that your RAM is not full, because at the first start the program will download and install the elements it needs:
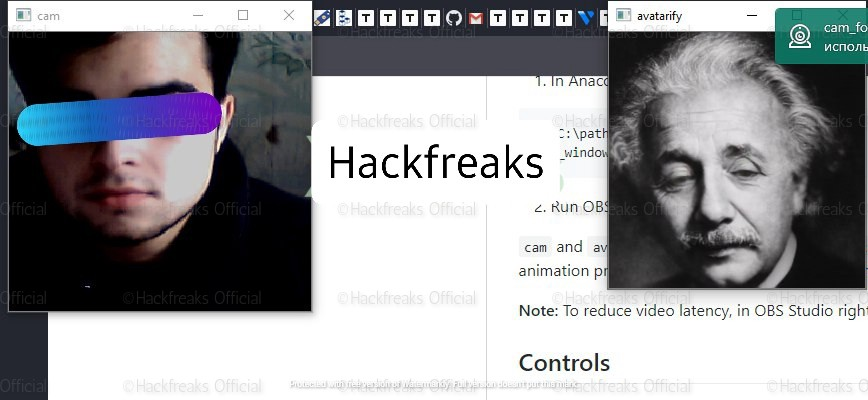
After a successful launch, 2 windows will appear on the screen, one with an image from a web camera, and the other with Avatarify:
Control
1–9: switch between faces;
0 (zero): turns on or off the display of the Avatar;
A / D: previous / next avatar from the folder;
W / S: zoom in the camera;
Z / C: adjust the opacity of the Avatar overlay;
X: resets settings, helps before use;
F: search for window and support;
R: webcam mirroring;
T: mirror image of the avatar;
I: show FPS.
Avatar management
Here are the basic principles for managing your avatar:
Align your face in the camera window as close as possible in proportion and position to the target avatar. Use the zoom in / out function (W / S keys). When you’re aligned, press X to use that frame as a reference to control the rest of the animation.
Use the overlay function (Z / C keys) to bring your and avatar’s expression as close as possible.
Alternatively, you can press “F” for the software to try and find the best position. This will slow down the frame rate, but while this is happening, you can keep moving your head: the preview window will flash green when it detects that your face pose is closer to the avatar than the one he is currently using. You will also see two numbers: the first number is how close you are currently aligned with the Avatar, and the second number is how close the frame of reference is.
You want to get the first number as small as possible — around 10 is usually a good alignment. When you’re done, press “F” again to exit keyframe search mode.
You don’t need to be precise, and some other configurations may give even better results, but this is usually a good starting point.
Now, download the plugin for OBS, as well as OBS Studio itself
https://obsproject.com/forum/resources/obs-virtualcam.539/ (choose to install and register only 1 virtual camera):

Launch OBS.
In the Sources section, click the Add button (plus sign), select Windows Capture and click OK. In the window that appears, select “[python.exe]: avatarify” from the drop-down menu of the window and click the OK button. Then select Edit -> Transform -> Fit to screen.
In OBS Studio go to Tools -> VirtualCam. Check autorun, set Buffered Frames to 0 and click Start.
The OBS-Camera camera should now be available in Zoom (or other video conferencing software).
We set up gps for registration and look for a clean ip for the city of registration!
METHOD 2
Link to DeepFaceLab
https://github.com/iperov/DeepFaceLab
Required files:
cuda_9.2.148_windows.exe (then restart)
cuda_9.2.148.1_windows.exe
cudnn-9.2-windows7-x64-v7.1.zip
THE PROGRAM WAS USED FROM 06/20/2019
AND IF YOU ENJOYING THE ARTICLE THEN SUBS TO THE OUR TELEGRAM CHANNEL IS APPRECIATIVE
Developer video
IMPORTANT !!!!
Regardless of how long your video is running, face swap processing will take the same amount of time.
The more iterations, the better. In the video with Lesha Shevtsov (itpedia), almost 80,000 were used
For the coolest indicator, you can use 500,000 (it will take 3–4 days, it all depends on the vidyuhi)
This is exclusively my rough draft for notes, I did not try to adapt it for anyone, I only did it for myself.
— — — — — — — — — — — — — — — — — — — — — — — — — — — — — — — — — -
1) AT THE ROOT OF THE DISC
There are versions after downloading
DeepFaceLabCUDA9.2SSE for NVIDIA graphics cards up to GTX1080 and any 64-bit processors.
DeepFaceLabCUDA10.1AVX for NVIDIA graphics cards up to RTX and processors with support for AVX instructions.
DeepFaceLabOpenCLSSE for AMD video cards and any 64-bit processors.
2) Put 2 files into the VorkSpace folder.
The first one is data_dst.mp4 — — this is the face that will be replaced
The second is data_src.mp4 — this is the person who will be used for the replacement.
3) Order
2) extract PNG from video data_src.mp4 — the program extracts the face that WE WILL REPLACE. Face PNG format
3.2) extract PNG from video data_dst FULL.mp4 — the program extracts the face that WILL BE CHANGED. PNG format
4) data_src extract faces MT all GPU — extracts a finite set of faces from PNG to the workspace \ data_src \ aligned folder
4.1) data_scr check result — check how the person, WHICH WE WILL REPLACE, was extracted.
4.2.2) data_src sort by similar histogram — After this sorting, the faces will be grouped by content, so it’s much easier to filter out unwanted faces.
Scroll and delete unwanted faces in groups.
4.1) data_scr check result — check how the person, WHICH WE WILL REPLACE, was extracted. We delete unnecessary ones. You see, the faces are now in line with the turn of the head.
1) data_src sort by blur.bat — Sort by sharpness. Run and wait for sorting. Then see the results. The dullest faces will be at the end. It is important for src to remove cloudy faces.
4.1) data_scr check result — check how the person, WHICH WE WILL REPLACE, was extracted. We remove unnecessary CLOUD FACES.
5) data_dst extract faces MT all GPU — Same as item 4, with some differences. If a face was not detected in some frame, then there is an option + manual fix for this — it allows you to manually specify faces in frames where no faces were detected at all.
5.1) data_dst check result
5.2) data_dst sort by similar histogram — If the target video contains other unwanted faces, you can do this sorting, and then it will be easier to remove these faces.
5.1) data_dst check result — remove unnecessary frames
6) train H64 best GPU — — better CTRL + F train … bat training
in manual_ru.pdf
WE WAIT
!!! 6) train H64 best GPU — once again. Some diagrams appear, then it closes.
7) convert H64 debug — — convert … .bat Face overlay. The debug option allows you to see the process of overlaying faces and some technical information for each frame in the console, press the spacebar in the viewport.
It seems like he always clicked 0. -3.01 in the video
7) convert H64 debug — AGAIN?
Combinations:
one
one
empty
empty
-five
empty
empty
empty
!!! 7) convert H64 debug — AGAIN?
Combinations:
one
one
twenty
40
empty
empty
empty
empty
7) convert H64
Combinations:
one
one
twenty
40
empty
empty
empty
empty
WAITING FOR COMPLETION
8) convert to mp4
WAITING FOR COMPLETION
Go to the RESULT folder and see a new file result.mp4
— — — — — — — — — — — — — — — — — — — — — — — — — — — — — — — — — — — — — — — — — — — — — — — — — -
Configs if you want to train with SAE
== Model options:
== | == autobackup: True
== | == write_preview_history: True
== | == batch_size: 2 (
== | == sort_by_yaw: False
== | == random_flip: False
== | == resolution: 192
== | == face_type: f
== | == learn_mask: True
== | == optimizer_mode: 2
== | == archi: liae
== | == ae_dims: 192
== | == e_ch_dims: 42
== | == d_ch_dims: 21
== | == multiscale_decoder: true
== | == ca_weights: true
== | == pixel_loss: False
== | == face_style_power: 10
== | == bg_style_power: 10
== | == apply_random_ct: true
== | == clipgrad: true
== Running on:
== | == [0: GeForce GTX 1080]
On the A64, everything is by default
— — — — — — — — — — — — — — — — -
ADVICE
H128, DF, LIAEF128 models:
Use pixel loss? (y / n,?: help skip: n / default):
allows you to quickly improve fine details and remove jitter. Enable only after 20k iterations.
— — — — — — — — — — — — — — — — — — — — — — — — — — — — — — — — — — — — — — — — — — — — — — — — — — — — — — — — — — — -
Site of the second program
https://faceswap.dev/forum/viewtopic.php?f=5&t=27
— — — — — — — — — — — — — — — — — — -
IMPORTANT !!!!
Regardless of how long your video is running, face swap processing will take the same amount of time.
For the coolest indicator, you can use 500,000 (it will take 3–4 days, it all depends on the video)
We set up gps for registration and look for a clean ip for the city of registration!
— — — — — — — — — — — — — — — — — — — — — — — — — — — — — — — — — — — — — — — — — — — — — — — — — — — — — — — — — —
METHOD 3
— — — — — — — — — — — — — — — — — — — — — — — — — — — — — — — — — — — — — — — — — — — — — — — — — — — — — — — — — — — — — — — — — — — — — — — — — — — — — — — — — — — — — — — — — — — — — — — — — — — — — — — — — — — — — — — — — — — — — — — — — — — — — — — — — — — — — — — — -
https://www.elladodelmal.com/2019/04/autoencoders-gans-y-otros-chicos-buenos_10.html — ARTICLE.
We set up gps for registration and look for a clean ip for the city of registration!
— — — — — — — — — — — — — — — — — — — — — — — — — — — — — — — — — — — — — — — — — — — — — — — — — — — — — — — — — — — — — — — — — — — — — — — — — — — — — — — — — — — — — — — — — — — — — — — — — — — — — — — — — — — — — — — — — — — — — — — — —
METHOD 4
Substitution of the image in the camera, in this way, for example, you can register the carger accounts on the left data, because in some applications it is impossible to load existing photos, for this we just need the installed Linux operating system.
1. Install the virtual camera
Install the codec; apt-get install git make ffmpeg
Clone the driver repository;
mkdir codek
cd codek
git clone https://github.com/umlaeute/v4l2loopback.git
cd v4l2loopback
Install;
make && sudo make install
sudo depmod -a
And we launch;
sudo modprobe v4l2loopback
We have a device / dev / video0 or the number above if you already had something
2. Start the translation of the image into the video stream of the driver ffmpeg -loop 1 -r 1/5 -i “path_to_image” -c: v libx264 -vf fps = 25 -vcodec rawvideo -pix_fmt yuv420p -threads 0 -f v4l2 / dev / video0
We must specify -loop 1 to loop this action.
3. Well, now the final stage, this is emulation, open Android Studio, open the window where the virtual machine is edited and in the camera settings, select our virtual device, start and take off life

We set up gps for registration and look for a clean ip for the city of registration!
METHOD 5
— — — — — — — — — — — — — — — — — — — — — — — — — — — — — — — — — — — — — — — — — — — — — — — — — — — — — — — — — — — — — — — — — — — — — — — — — — — — — — — — — — — — — — — — — — — — — — — — — — — — — — — — — — — — — — — — — — — — — — — — —
https://www.limontec.com/2018/02/deepfakes-criando-videos-porn-falsos.html — ARTICLE
We set up gps for registration and look for a clean ip for the city of registration!
METHOD 6
Creation of camera spoofing
https://github.com/corkami https://github.com/corkami/mitra
file1 first (top) input file.
file2 second (bottom) input file.
optional arguments:
-h, — help show this help message and exit
-v, — version show program’s version number and exit
— verbose verbose output.
-n, — nofile Don’t write any file.
-f, — force Force file 2 as binary blob.
-o OUTDIR, — outdir OUTDIR
directory where to write polyglots.
-r, — reverse Try also with <file2> <file1> — in reverse order.
-s, — split split polyglots in separate files (off by
default).
— splitdir SPLITDIR directory for split payloads.
— pad PAD padd payloads in Kb (for expert).
We set up gps for registration and look for a clean ip for the city of registration!
METHOD 7
For those who could not pass verification (and I know that there are many of them). Keep a fit. After all, Badoo is one of the leaders in the number of mammoths and wankers.
Snapchat has a gender reassignment filter. This feature allows you to easily pass verification on Badoo, and then accept jerk traffic and make money on it in all known ways.
You need to open the camera in the application, to the right of the “Take photo” button there is a drop-down gallery of masks — the necessary filters are there;
Among the “masks” there are two: one with a man’s face, the other with a woman’s. These are the “gender reassignment” filters;
After activating the filter, you need to position the camera so that the face falls within the boundaries of the “mask”;
The filter works only in “live” mode, you cannot add photos from the gallery. But you can switch to the rear camera and, for example, capture the face of the person in the photo.
We set up gps for registration and look for a clean ip for the city of registration!
METHOD 8
First, https://developer.nvidia.com/cuda-80-ga2-download-archive and install CUDA 8.0
The installation is standard, after we reboot. You don’t need to patch anything.
Download fakeapp
Download https://ffmpeg.zeranoe.com/builds/
IMPORTANT! LET’S REPEAT IN A POINT !!!
We unpack FakeApp.zip to the root of the C drive. Also, in the root of the C drive, create the fakes folder, inside we create the data, data_A, data_B folders.
ffmpeg, unpack it into the FakeApp folder.
We get such a picture
Video stage preparation
I have uploaded a video from the interview of Chloe Moretz and now I need to cut sections of the video with her face using any video editor.
Save the cut video in 720p quality to the C: \ fakes \ data_A folder and call it 1.mp4
We launch the command line, write:
C: \ FakeApp \ ffmpeg \ bin \ ffmpeg.exe -i C: \ fakes \ data_A \ 1.mp4 -vf fps = 25 “C: \ fakes \ data_A \ out% d.png”
In the C: \ fakes \ data_A folder, we see how the pictures appear, we are waiting for the process to complete.

After completion, delete video 1.mp4 in the C: \ fakes \ data_A folder
Run fakeapp.bat in the C: \ FakeApp folder
Select Align, specify the Data field C: \ fakes \ data_A
Click Start.
WE ARE WAITING FOR FULL COMPLETION!

An aligned folder will appear in the C: \ fakes \ data_A folder where all her faces are ordered.
Stage # 2
Find a video for a friend and repeat the whole process, only instead of data_A we specify data_B. The main video for a friend should be one face, if there are several faces in the frame, the program will change all of them.
After the aligned folder with ordered faces appears in the data_A and data_B folders, we proceed to training. This process is an asshole, because it takes a lot of time to train a neural network.
Go to the Train tab
In the Data A field, specify the path C: \ fakes \ data_A \ aligned
In the Data B field, specify the path C: \ fakes \ data_B \ aligned

Click Start and wait. We observe how the neural network gradually learns and the quality of the photo improves. If you are tired of waiting or the quality suits you, press the Q key, the program will save the “scales” of connections and you can continue the calculations in the future, nothing is lost.
The neural network will learn for about a day at 1050ti.
It doesn’t take long to glue the finished video, it takes a maximum of 1 hour.
METHOD 9
Well the game is easy, nothing much.
Install Crazytalk free software from internet or any similar 3D animator will work. Use the portrait picture which you used in DL.
From the crazytalk software you can make the face moving of a picture. I’m attaching 2 kinda video tutorial with this article.
Video tutorial:
1: https://youtu.be/y6NSEoPq_0Q
2: https://youtu.be/CPMkAqoLCAM
After that, export it or screen-record the moving face.
Now install manycam or similar software. They turn your webcam to any custom videos you need. Setup the manycam
(Some settings need to be done, you can learn from YouTube)
After that, add the face moving Video to manycam software
At verification page when it opens camera, manycam will work as the camera. you can use or set the picture or any video on your choice that you want to show.
So at while verification, when it ask for camera verification, manycam will open instead of webcam and will play the video or photo you inserted.
when you put face moving video, they will recognise as real and will verify you. Also to upload DL you can use the same way.
That’s it, best of luck
Donate : 32GFwevY5gFQ4qNU19hEaPUSDwT9g7X4zr
Passes for SBA and PPP Easily
WARNING
Attention! All information is provided for informational and educational purposes only. The author is not responsible for any possible harm caused by the materials of this article. All further steps were performed for educational and research purposes only. The author does not intend to harm any company or individuals.
Monetization options
Webcams;
Blackmail;
Identification;
Etc.
- you fasten the client’s photo to the “naked body”
- you attach a photo to a video and go through identification in affiliate programs / services
We set up gps for registration and look for a clean ip for the city of registration!
bitzlato
hodlhodl
paxful
bitpapa
cryptolocator
localcryptos
localcoinswap
garantex
Whitebait
Totalcoin
Risex
Vertex
prizmBit
Bitcoinglobal
skyBTCbanker
SkyCrypto
monabey
bisg
Localmonero
AgoraDesk
And others.
Thanks for reading!


